You could use these cute Bracket Books for individual pages or to create a fabulous book, just use your imagination.
Don't forget to put your STM affiliate (similar to STMMMS47642) code near your downloads, so your readers can go and purchase the software and completely customize their projects.
TIP:
Remember to set your margins as small as possible on your printer to get the best size book possible!!!
NOTE:
Each Freebie has a different page layout, but contains a total of 6 pages for your book. Your finished book will hae 3 double sided pages when printed.
part 1
part 2
part 3
All of our Friday Freebies will now be MyMemories Suite Compatible. What does that mean??? It means that you can now load the freebies directly into your MyMemories Suite Software, and then completely customize them with any paper and embellishments that you have. Check out
MM Suite Here. Also if you use this code you can get an extra 10$ off STMMMS78325
Using MyMemories Software to Customize your Bracket Book
1.Download template file and install it into your software
2. Using MyMemories Suite, choose Create Album From Designer Template and find your project
3. Now you can print and enjoy the provided template, or customize it with your own papers and embellishments.
TIP:
You can right-click on the white guide and lock it in place to keep it from moving while you are working. Make sure this is the top layer of your project before printing.
Instead of adding the paper as a background paper, you can add it as an embellishment so that you can move the paper around. This is especially useful when using papers with stripes or circles, so you can decide which part of the paper you want to use.
Once it is added as an embellishment, you can now select the paper and move it into the position you want it.
Just SAVE and PRINT on cardstock!
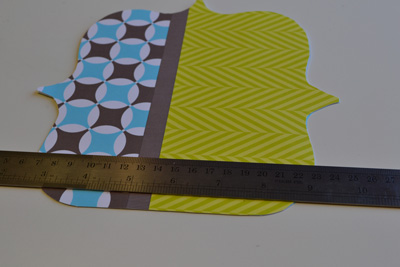
Bracket Book Tutorial
1. Print your Bracket Book on cardstock and gather supplies. (Recommended supplies: pen/pencil, ruler, small scissors, ribbon or jump rings)
TIP: When printing on both sides of a page, remove the white cutting guide from one side of the page before printing. This way you don't have to worry about lainig up the 2 sides just perfectly when you print!
2. Cut out along white cuttng uide lines on all of your pages.
3. Using the ruler, mark where you want to punch your holes to put your ribbon or jump rings in.
4. Punch holes where you marked.
5. Tie ribbon or use jump rings to bind your book together.
TIP:If using ribbon, make sure to leave about a fingers space in your loop, do not tie the ribbon too tight, this will make it so that it is easier to open your book